Making a simple but reliable
practice jump
 Hi,
it's Carmen here. My dad Rich has been working on some plans for building a simple, inexpensive
and easy to make practice jump that we would like to share with you. We'll show you pictures of
how we did it. As you can see I am an 'All American' (i.e. mixed breed or cross) so please
excuse my American English. My measurements will be in American, too - I never did learn about
the metric system at dog school. Hi,
it's Carmen here. My dad Rich has been working on some plans for building a simple, inexpensive
and easy to make practice jump that we would like to share with you. We'll show you pictures of
how we did it. As you can see I am an 'All American' (i.e. mixed breed or cross) so please
excuse my American English. My measurements will be in American, too - I never did learn about
the metric system at dog school.
Carmen says...
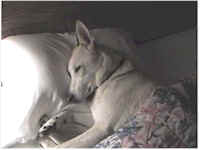
The first thing that Dad has to do is to buy all the material
required. Since I have been working hard all morning, I’ll sleep on the couch while Dad
runs to the hardware store to buy the following items for one jump:-
-
12 feet x 1" PVC
(plastic pipe)
-
1 x 1"
elbow, PVC
-
2 x 1"
tees, PVC
-
8 x ¼"
screws
-
8 feet x
¾" PVC
-
Some pretty
colors of tape for dressing the bars
-
Don’t forget
the PVC glue
He already has the jump
cups. He bought these real cool (and inexpensive) cups to hold the bars from a guy here in
California. They are easy to mount and almost make my jumps look like something from a catalog.
You can probably buy some from Martin Pollard. (See the
Agilitynet Shop for order details.)
 First
get all of your tools ready to use First
get all of your tools ready to use
To do the job, you’ll need the following things:-
-
PVC cutter
-
Tape measure
-
Pencil
-
7/16" wrench and
screw driver or something to fasten with
-
Cookies (Very
important. You need these during the photo shoot to keep your handler’s interest up.
My Dad prefers Oreo cookies but yours might like Digestives or Jaffa Cakes.)
Ready to start
Yawn, what a nice nap, the sun was shining, there was this frisky little ground
squirrel... Oh the jumps, right.
 Dad
just walked in. He’s finished cutting all the PVC. He started with the 1" PVC only. He
said to wait till the end to cut the ¾" stuff. I guess he’ll explain later, but these are the
lengths and quantity you'll need to make one jump: Dad
just walked in. He’s finished cutting all the PVC. He started with the 1" PVC only. He
said to wait till the end to cut the ¾" stuff. I guess he’ll explain later, but these are the
lengths and quantity you'll need to make one jump:
-
1 x 45"
-
2 x 30"
-
2 x 16"
-
1 x
2"
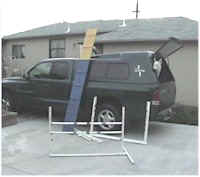
This jump will be smaller
than regulation in just about any country, but your handler won’t notice, and it will be easier
to load in your car.
Dad mentioned that if you
are building a set of four, this happens to be five x 10-foot lengths which is just about
perfect. You need to clean the ends (not with your tongue) before you start gluing. Since you
don’t need a structural or leak-proof bond, just smooth the ends with some light sand paper, so
it’s easy to put together.
Now it’s time to glue. I
just can’t stand the smell, and Dad thinks it’s bad for me, so he’ll have to explain the order
and technique.
 Rich
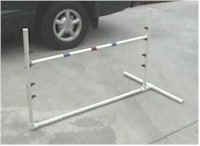
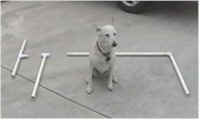
says... 'Thanks Carmen. Let’s do this in steps so that we don't make
any mistakes and have to go back to the hardware store. This is a good time to look at the
pictures. Glue the stabilizer together first. That’s the section that consists of the one real
little piece, the two other small pieces and one of the 1" tee’s. Look at the picture
(right) and glue it like it shows. It’s easy - what we call a 'no brainer!" The other
piece at this time will only be one of the "standards" (that’s what we call them) and the base
pole attached with the elbow. Rich
says... 'Thanks Carmen. Let’s do this in steps so that we don't make
any mistakes and have to go back to the hardware store. This is a good time to look at the
pictures. Glue the stabilizer together first. That’s the section that consists of the one real
little piece, the two other small pieces and one of the 1" tee’s. Look at the picture
(right) and glue it like it shows. It’s easy - what we call a 'no brainer!" The other
piece at this time will only be one of the "standards" (that’s what we call them) and the base
pole attached with the elbow.
We’ll also glue the other
standard with the other 'tee,' so all the pieces should be attached with glue to something
else.
 Before
I let Carmen out, I’ll probably finish the gluing. Oops she got in the picture. This may seem
like a long time, but so far I’ve spent more time typing this for you guys than I have picking
up hardware, measuring, cutting, and gluing. Before
I let Carmen out, I’ll probably finish the gluing. Oops she got in the picture. This may seem
like a long time, but so far I’ve spent more time typing this for you guys than I have picking
up hardware, measuring, cutting, and gluing.
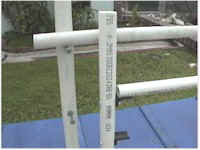
And then, glue the other
standard that has the 'tee' on it, the base pole that has the 'ell' and other standard. I want
you to look at that picture and think about what
is going on. If you glue these together hap
hazard, the angle of the pole may vary across the two standards, and the distance between the
standards would be such that you would need custom length poles for every jump.
So I used one pole as a 'stop' up against the fittings prior to my final gluing.
At this juncture while
Carmen and I are waiting for the glue to dry, I’d like to mention that you could add caps on
the stabilizers and the standards. That would increase
the price of each jump some. Although the caps are not necessary, they finish off the 'look' of
the jump very nicely.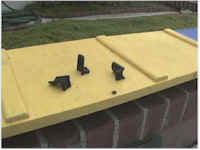
Carmen keeps butting in
and trying to tell me that I could have been more efficient by drilling the holes for the jump
cups before gluing, and she has a valid point. But I’m the one with the thumbs in this
family, and if you try to do that you will be fighting alignment of the holes, to the standards
along with getting the correct height. Also don’t forget that the height of the top of the bar
is not where you will drill the hole to mount the jump cup. More on that later.
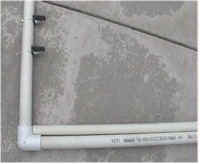
Now let's talk jump cups
There are many different ways to support the bar on the standards. Some ways involve
cutting into a PVC tee. Other ways utilize just screws, see the comparison photo. The jump cups
that I have used on these jumps are very simple and meet all specifications. It can mount
on round tubing, like we used here or on a flat steel standard. They are inexpensive and will
last a lifetime.
Well, there’s not a whole
lot to add at this point. I ended up cutting my poles to 45 ¼" long. If you have enough
property to always keep your jumps set up (we’re jealous!), then glue the standard. If
you want to transport your new jumps in a small car, don’t glue on the stabilizer bar.
Carmen says...
And that's how to make some very nice jumps that don't cost a lot.
 About
Carmen, Warrior Princess & Rich Dieppe About
Carmen, Warrior Princess & Rich Dieppe
Carmen is a whippet/shepherd mix who was rescued from a local shelter. She lives with four
other brother and sister dogs including a Whippet puppy, five cats and Rich and Ginny Deppe in
Port Hueneme, California (USA). Her favorite sister Kelsey (PWD) is also involved in agility.
Carmen has her AAD title in USDAA, and her NADAC; EAC,
OJC, and OGC. She takes three classes a week, and one private one. Luckily she lives in an area
that makes trialling easy. She has quick access from the Bay area to San Diego.
Over the last few years Team Carmen has grown to
understand the sport of agility not for what it is, but for what it isn’t. Week after week we
continue to have fun, and try to burn as much energy as we can. Since we have entered the
Master’s ring (USDAA) we’ve realized that this sport isn’t about placement and winning.
We haven’t placed in our class for over a year. But 'lawdy' do we have fun!
Carmen also does therapy work and obedience. Since she
can only do obedience with the UKC, it's taking a while to get her UCD. (There are few UKC
trials in Southern California).
Carmen's future will be a happy one. Although she has
great potential as a champion, her handler Rich insists that he will not spoil the fun. He
promises that he will not get a Border Collie puppy just to compete. He will not get mad at
Carmen nor will he lose sight of the reason he started this sport. Together they will try to be
more of a team, and to know each other. Ever since Rich started thinking like this, Carmen's
got faster!
Rich has been teaching a
beginning pet obedience class and a little agility this last year. He has also been become a
judge for the USDAA.
To find out how to make
your own weave poles, see Carmen's Recipe for Weave Poles.
From Dee
Quaschnik
I just finished making two practice jumps and I am very pleased with how they turned out!
I also used the closet clothes rod holders for the cups
to hold the jump-bar. I just hack-sawed through the one that is a full circle to make it a
partial to allow the jump-bar to fall out if it is hit.
I'd like to know if this person has made an elevated
'catwalk' and an A-frame for the agility equipment.I
have constructed a tunnel also using nylon fabric from a
discount table and firm wire to run through a few times and hold the shape. It only cost me
about $15 and some sewing to make a really long tunnel for the dogs.
Thanks again for your listing the do-it-yourself
plans for the practice jump. (31/08/01)
|