Some tips for improving your own
images...
 Photography
has been Chris Tarling's full-time day job for a number of years now. Over that
time, he calculates that he must have captured well in excess of half a million
images of dogs running an agility course and worn out several cameras with that
level of shooting. He's agreed to share some of his professional tips for taking
action shots of your dog in the ring. It's more challenging than you think...
Photography
has been Chris Tarling's full-time day job for a number of years now. Over that
time, he calculates that he must have captured well in excess of half a million
images of dogs running an agility course and worn out several cameras with that
level of shooting. He's agreed to share some of his professional tips for taking
action shots of your dog in the ring. It's more challenging than you think...
Photography is my livelihood so first and
foremost I want to maximise my sales. I've found that by far the most image
sales are to the Beginners level, maybe as much as 80% of my revenue. When I first
started out at shows I followed the Beginners' classes around the show from ring
to ring, but discovered that this was, in fact, counter-productive as it was
generally the same group of competitors.
I then switched to choosing a ring and
staying on that ring throughout the day, which I've found to be a more balanced
strategy. If it's a two day show, I'll choose an Agility ring one day and then a
Steeplechase or Jumping ring the next as some Beginners, just starting out, would
prefer images avoid the agility contact equipment.
Firstly, where to position
yourself
If there's a choice of rings that I feel have a
good mix of classes, I need to decide which one to pick. Life is always a
compromise and so, with agility photography, there are quite a number of things
to consider before settling down to shoot actual images.
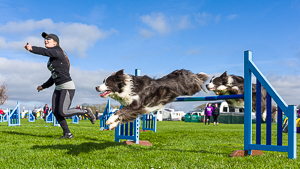
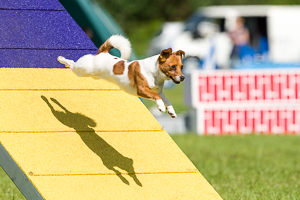
 My aim is to produce images that show the dogs at
their best – like the canine athletes they are - so I try to position myself
where I can get not only a 'key' image but also shots from several other
places around the course.
My aim is to produce images that show the dogs at
their best – like the canine athletes they are - so I try to position myself
where I can get not only a 'key' image but also shots from several other
places around the course.
First off, I always make sure that I watch the
competitor course walk as this reveals so much about which shots are
possible. Sometimes I'll walk it, too. I'm looking for that 'key' obstacle
and the other possible lines of sight. But it is also important to know where the handler
is likely to
be in relation to the dog? This is why paying particular attention to the
course walk is so important. Is my chosen location likely to present me with
lots of blocked shots i.e. handler between my position and the dog? This is
especially important for Beginners classes as beginners tend to be right
alongside their dog – especially so for the Toy and Midi height dogs.
You might be surprised
at just how much there is to consider in getting the best images.
For instance, is the sun shining?
Yes? Boo!
It's a common
misconception that a bright sunny day with little cloud is a 'great day for
agility photography!'
Early morning sun can especially be a real problem
as it gives very harsh shadows and will cause exposure problems with bright
dogs unless compensated for. Yes, dramatic shots are possible but it's not good
for general shooting. In general, I don't want to be shooting into the sun so
full sun may eliminate one, possibly two, sides of the ring as possible shooting
locations. There's another consideration too – images shot in full sun will
generally need more in the way of post-processing. I may need to underexpose to
preserve the highlights and then work some magic in post-processing.
If the sun isn't shining - huzzah! Then I can ignore it as a restriction
and look forward to a day shooting images with nice even lighting and no
deep featureless shadows - and less time post processing! Ideal conditions
would be a bright dry day with a layer of thin high cloud to give very
diffuse lighting – lovely!
Photographing an Agility class is really
about the contact equipment so I'll make my decision on my location
accordingly. Often a fast approach to the see saw will lead to some
spectacular images – though not what the handler intended!
 Where is the judge likely to stand? This is another
potential cause of blocked shots and one that you may only know for sure
when the class starts. Incidentally, I don't like to interfere with the
running of a ring. It's my job to get the best images I can within the
constraints presented to me. The best compliment a judge can pay me is 'I
didn't know you were there.'
Where is the judge likely to stand? This is another
potential cause of blocked shots and one that you may only know for sure
when the class starts. Incidentally, I don't like to interfere with the
running of a ring. It's my job to get the best images I can within the
constraints presented to me. The best compliment a judge can pay me is 'I
didn't know you were there.'
Is my chosen position right in the
dog's likely sight line, or too close to the dog's likely path? It might
be okay if you are sufficiently far away or are shooting senior or masters dogs,
but it would be inadvisable to sit right at the ring side with dogs very
close and / or coming straight at you. Whilst it may be a great position to give
fabulous images, you must consider your impact on the dog's run. Beginner and
novice dogs are very likely to be distracted! I am always mortified when a
dog heads straight for me to say hello!
Okay, so now I'm homing in on my position.
But what about the background? Ideally I want a clean background so that I can
isolate the dog, but very often the background is a case of Hobson's
choice. Generally, the area around an agility ring is incredibly
busy with trade stands, people, cars and caravans, etc. I try to position myself to
minimise backgrounds as far as I can, but it's not always possible and I have to work with
what is there and get creative with my shooting angles - perhaps getting down
low and looking down to
simplify the background.
My chosen position may give image
options that will vary with dog height. Once the jumps go up for the
larger dogs, some photo sight lines will disappear – what was 'over' the jump
with the Small dogs will now be below the jump for the larger heights. For example, a tunnel exit behind
a jump may be a good image for the Small and Medium dogs but won't be for
Intermediate or Large ones.
Once I have decided which ring and my exact
location I will approach the ring judge. I always ask for permission to
photograph their ring, and never assume that it will be given. This to me is
common courtesy but it's also an opportunity to discuss my location (does the
judge have any concerns?) and more basically to make them aware of what I am
intending to do. Ideally I like to avoid complicating the judge's day!
 Down
to business - time to take photographs
Down
to business - time to take photographs
Ideally I'd like to get down
to the dog's level and engage with my subject. Generally I'll sit on the ground, maybe
even lie down or use a very low 'beach' type chair. Some rings may have a
perimeter fence so that I will have no option but to shoot over it.
Standing- or at least sitting on a normal
size chair - can sometimes be the best option, especially for the largest
dogs or for images of dogs going over the highest obstacles, such as the dogwalk or the A-frame.
I will track the dog through the camera
viewfinder as it makes its run and be ready to press the shutter at my
pre-chosen jumps. As I am continuously watching the dog, I am also ready for the unexpected – perhaps a moment of dog comedy
or a touching moment between dog and handler. Doing this, I may also see additional image opportunities around the course, or
conversely that I need to move slightly. Shooting in this way requires
excellent panning skills. Over time, however, panning and maintaining focus become
second nature, almost a muscle reflex.
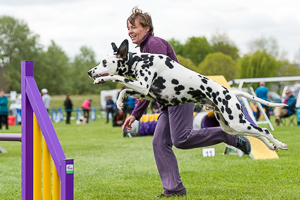
I try to include the handler in at least
some images. Most handlers ask for their presence to be edited out, but there will be
precious moments of interaction – maybe it will occur when they are setting
up for their run or perhaps it will be a show of joy at the finish line.
Beginners generally just want images of their dog – more experienced
handlers like a good 'team' image!
Typically I'll shoot only three images of
a dog over an obstacle, maybe more for a piece of agility equipment but this
is plenty for a jump.
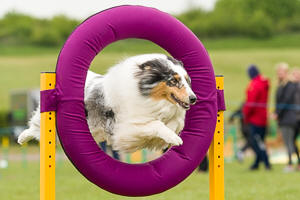
In terms of composition, I'm aiming for
the dog to be positioned in the frame such that it is always moving into
space. An arresting frame-filling happy dog is definitely a plus!
 Equipment
and settings - some thoughts
Equipment
and settings - some thoughts
I would guess that each 'pro' has their own way
of doing things, but this is what works for me.
My most versatile go-to camera and lens
combination for an agility event is my Nikon D500 DSLR and Nikon 70-200 f2.8
lens. In my humble opinion, they are hands-down the best compromise for event images.
Why? Well, it's a reasonably light weight package,
has fast and accurate focusing, a versatile effective focal length range from
105 to 300mm - enabling me to get saleable images from right across the ring - and
a decently high frame rate of 10fps. But... and it's a sizeable but - this combination
costs roughly £3400 and that's before you add in a large memory card. To me it's a tool but
something not everyone can afford.
My advice to you is just make the most of whatever
camera you have. The great thing about digital is that pressing the shutter does
not come with much of an associated cost. I still occasionally shoot with film and am always very aware of how much each
press of the shutter on a 36 exposure roll costs. Fire away and learn from your
experience.
Generally, I don't change my camera settings too
much during an event. I aim for a shutter speed of 1/1600 to 1/2000th of a
second with a lens aperture of f4 or f2,8. Within reason, I'm not bothered what
the ISO setting is so I shoot on Auto ISO and let the camera worry about that.
It's more important that I keep the shutter speed where I want it. I'll have
the focusing set to continuous autofocus and at its highest frame rate. I will
use single point focusing which allows me to choose where I want the focus point,
and I will aim to keep this over the dog's eye as I track it around the course.
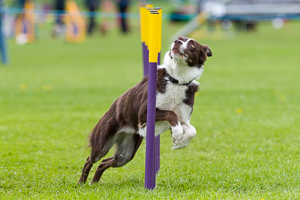
There is skill involved in capturing sharp
well-exposed shots. It's a combination of knowing what you need to do with your
camera and physical practice. Some dogs are a real challenge to track – I'm
thinking spaniels, in particular, who seem to rarely take the obvious or shortest path – but
the more you shoot the more your photos will improve.
 One
last, but very important point
One
last, but very important point
If you do
attend a show with an intention to take photographs, please do be mindful of the
professional photographer there who is trying to earn a living.
When I photograph a
show, it generally doesn't concern me that there may be other photographers as
long as they keep their images to themselves. This means no giving away free
images on Facebook.
Remember that the professional will have paid to cover
the show, has business insurance and trade stand costs to cover, and will also
be spending time post-processing and uploading images to a website. Put another
way – if someone came to your place of work and started providing what you do
for free, how would that make you feel?
Happy shooting!
 About the author...
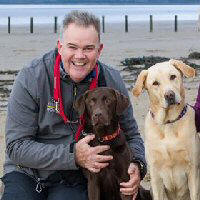
Chris Tarling is a full-time professional photographer based in the
Cotswolds. As the founder and owner of Yellow Hound Photography, he has been a
regular on the Agility show circuit. A dog lover first and a photographer second,
he captures a wide range of photographic subjects from dogs and horses to
commercial commissions, weddings, portraits and classic cars.
Officially he stopped doing agility shows to focus on building
a profitable photography business at the end of 2018 but recognised that they
were not something he would leave behind completely. He is open to any
organisers who are interested in getting in touch.
Chris can often be seen being taken for a
walk by his two Labradors Coco and Marley.
He can be contacted by
email or via the
Yellow Hound website.
First published 14th May 2020