Repair, refurbish and/or make your
own...
 In
these unprecedented COVID-19 times of social distancing and self isolation, many
people would like to be able to train at home but don't feel they because they
don't have
equipment.
Long term you may want to invest in proper equipment but for now, you may
be able to renew some old jumps or knock up something cheap and cheerful, using
things you find around the house or caravan.
Di Whiting and Mike Jackson have done just that. In
these unprecedented COVID-19 times of social distancing and self isolation, many
people would like to be able to train at home but don't feel they because they
don't have
equipment.
Long term you may want to invest in proper equipment but for now, you may
be able to renew some old jumps or knock up something cheap and cheerful, using
things you find around the house or caravan.
Di Whiting and Mike Jackson have done just that.
Make do & Mend
Di Whiting
Enforced long periods
at home haven't bothered me.
I
enjoy a bit of DIY and have made jumps for horses in the past, so
I've been making
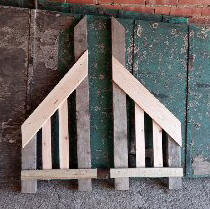
jumps and renovating some old Agility and Working Trials equipment.
In the past, I'd
gathered together an A-frame, donated by a friend who had upgraded, three old
jumps and a number of wooden poles which were thrown in when I bought a working
trial scale from another friend as well as a non-spec tyre, left in one of my
paddocks (I'm horsey!) by a group who used it for agility. More recently I
bought second-hand but perfectly useable a dog walk in excellent condition, a
seesaw in need of TLC and some good weaves. I already had a working trials long
jump which wasn't quite spec for agility but not far off.
 So,
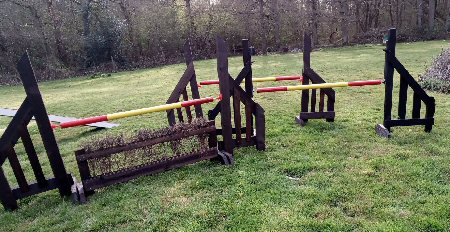
after checking the dimensions on the Kennel Club website, I foraged around our
farm for some pieces of timber left over from building repairs and construction
to make some wings. Luckily there were some odd pots of paint and timber
preservative lying around as well to finish the job. It meant there was not much
uniformity among my new jumps, as I was working with oddments of wood, but no
doubt the dogs won't mind! All the wings were finished with wood preservative as
being easy to apply and maintain. So,
after checking the dimensions on the Kennel Club website, I foraged around our
farm for some pieces of timber left over from building repairs and construction
to make some wings. Luckily there were some odd pots of paint and timber
preservative lying around as well to finish the job. It meant there was not much
uniformity among my new jumps, as I was working with oddments of wood, but no
doubt the dogs won't mind! All the wings were finished with wood preservative as
being easy to apply and maintain.
I'd previously bought
some plastic jump cups to screw on from the internet. Training only at 60cms, I
didn't need to consider different heights.
Furthermore, I have
started renovating the A-frame. It's covered with sanded gloss paint which is a
devil to get off but, once this is done and the surface repaired with some
additional plywood in places, then prepared, I will put rubber granules on it.
These were ordered via the internet from Contactacoat – excellent service!
I had to use the
internet for additional paint as well as the rubber granules as DIY stores are
currently closed and I wanted 'Post Office Red.'
 I
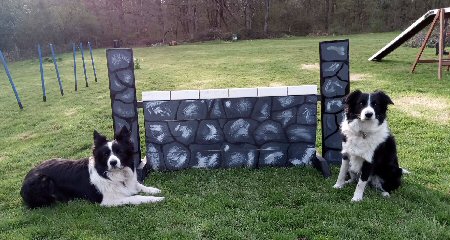
am proud of my 'stone wall' with lightweight capping made of half round white
guttering. I have also made a small 'brush jump' stuffed with heather and
trimmed up. Nice to be a little creative! I
am proud of my 'stone wall' with lightweight capping made of half round white
guttering. I have also made a small 'brush jump' stuffed with heather and
trimmed up. Nice to be a little creative!
The seesaw is a job
in progress – dismantled and prepared to paint. I'll put rubber granules on the
contact areas if there are some left over, or may push the boat out and get some
more! However, I consider traction to be far more important on the A-frame. The
dogs have been using the seesaw quite happily with a sanded surface to date.
In addition to
Agility, I compete at Working Trials and now have three useable, smart WT
obstacles now. The scale has been dis-assembled, treated and re-assembled, and a
clear jump built from scratch with scrap timber and a broom handle. Before I was
using an agility jump with higher cups. The long jump elements have been
renovated, using metal paint on the supports and tops stripped and repainted.
I hope this enforced
virus holiday will last long enough for me to complete everything!
Jumps
& Weaves
Mike Jackson
I had
decided I wanted to
build some new agility equipment, so I raided the garage and van to see if I
could find some materials to use starting with jump made with plastic waste
pipes, a hot metal gun and some cement left over from building some steps. A
couple of people have asked me how I made the jump wings so I posted some
information on Facebook and then agreed to write this article.
As I am a plumber I had some pipe
kicking around but the likes of B&Q and Screwfix are open for 'essential'
supplies and, at this time, so you can still order online.
Here's what you need
to start:-
-
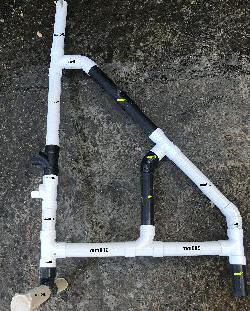 6m
x 1 1/4 waste pipe per pair of wings and one jump pole 6m
x 1 1/4 waste pipe per pair of wings and one jump pole
-
1 1/2 pipe for
cups
-
Caps for the
poles
-
 Solvent
glue Solvent
glue
-
Hot metal gun
-
Plastic pipe
shears/cutters or saw
-
16 x tees
-
6 x 45 degree
bends
-
6 x straight
couplings
-
6 x blanks
-
Solvent weld
cement
-
Ballast to weigh
the poles such as cement, PVA slurry, pea beach or sand
*
You can use 1 1/2
pipe but it will alter some of the measurements of pipe lengths.
Note: The pipe
lengths in the picture are taken from one of the jumps but not all fittings are
the same size so they may not be exactly the same for your jump. It gives a good
idea of the amount of pipe needed though.
I started by laying
out the fittings on the floor in the correct positions to confirm the pipe
sizes. Then I dry assembled the whole thing to make sure it all fitted together.
If you want different jump heights, put one section of pipe in 520 long and mark
where you need to cut the pipe to get the supports at the right height. Don't
forget that the height measurement is to the top of the pole not to the height
of the jump cup.
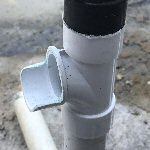
 To
make the jump cups, I took a tee and cut through the branch just over half way
down so the pole doesn't sit in the cup too tightly. Then I cut at 90 degrees,
removed the top section and sanded the rough edges off and rounded the corners. To
make the jump cups, I took a tee and cut through the branch just over half way
down so the pole doesn't sit in the cup too tightly. Then I cut at 90 degrees,
removed the top section and sanded the rough edges off and rounded the corners.
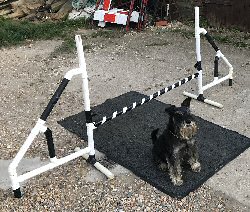
For the final
assembly before gluing, I made the wing in two sections. For the first section,
I glued the bottom together as far as the bottom rail so that you have got three
sockets facing upwards. Then I assembled the top section. Before joining the two
sections together, put in whatever you are using as weight. You can use cement
and PVA slurry but pea beach or sand would work just as well. Make sure that
whatever you use for weight that the sockets on the bottom section are clean
before you attempt to glue the two sections together. Don't forget that the glue
used is a solvent glue and shouldn't be used in confined spaces.
You should now have
enough pipe left over to make a 1.2m jump pole. I wrapped black gaffer tape
around the pole in a stripy or spiral pattern so that it was easily seen. You
could paint the pipe but warning... paint tends not to key to plastic pipe very
well and will scuff off very easily.
Next
project - weaves
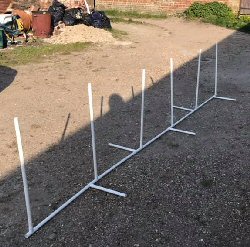 To
make freestanding weaves which can easily be used indoors or outdoors when it's
not too windy, you need:- To
make freestanding weaves which can easily be used indoors or outdoors when it's
not too windy, you need:-
-
3 x 3m lengths of
overflow pipe
-
11 x tees
-
Glue
These measurements
gave me the correct 600mm spacing with the tees I was using so I suggest that
you check before cutting all the pipe to length.
-
Outriggers =
300mm
-
Uprights = 700mm
-
Lengths along the
floor = 520mm
-
Short sections
joining the tees that are close together = 50mm
I
started with a single tee with the branch upright and fitted a 520 length into
this. Then I fitted a tee with the branch pointed to the right, followed
immediately by a tee with the branch pointing up. Then a further 520 section
followed by a tee with the branch pointing to the left, followed by another tee
with the branch pointing up. Carry on in this fashion until you have completed
the whole length, alternating the every other tee. You can now fit all of the
outriggers and the uprights.
Dry fit everything
before gluing to make sure that you have got everything correct. Remember that
the outriggers should be on the opposite side of the upright to where the dog
passes and the dog enters the weaves with the first weave in their left.
Once you are happy
that all is correct you can glue it together. To help with keeping everything in
the correct orientation when gluing up, you can put a pencil mark across each
joint before you disassemble and line the marks up when you glue. I made up the
first section as two weaves and then left the end of the tee after each pole
free to make the tees easier to transport and store.
 About
the authors... About
the authors...
Di
Whiting enjoys showing, herding, therapy work and working trials with her
Border Collies as well as agility.
She started agility a
relatively short time ago after realising that her nine year old dog Eric
(litter brother to Naarah Cuddy's international dog Sassy) wasn't going to
manage the six foot scale and nine foot long jump in Working Trials for much
longer. He took to agility with enthusiasm and reached the Kennel Club Starters
Cup at Discover Dogs last year, coming 3rd in the Jumping
She lives in Surrey.
 Mike
Jackson
took up agility about ten years ago with Bertie, a Miniature Schnauzer. Bertie
is Grade 7 and still competing at nearly 11 years old. He also runs his five
year old Miniature Schnauzer, Boris, who is Grade 6. Mike
Jackson
took up agility about ten years ago with Bertie, a Miniature Schnauzer. Bertie
is Grade 7 and still competing at nearly 11 years old. He also runs his five
year old Miniature Schnauzer, Boris, who is Grade 6.
Mike qualified as an
instructor in 2015 and is now head instructor at two KC clubs. He also qualified
as a Kennel Club judge in 2017 and now judges on a regular basis.
He
is a self-employed
plumber who lives in Sussex.
First published 6th
April 2020
|